3D printing
Print your own homelab parts: 10-inch rack, Pi mounts and cable management
Print useful 10-inch rack accessories, vented Pi 5 mounts and cable organizers. Choose filament, inserts and fasteners, and know when to buy metal instead.
OUR PICKS / YOUR SETUP
Find your fit.
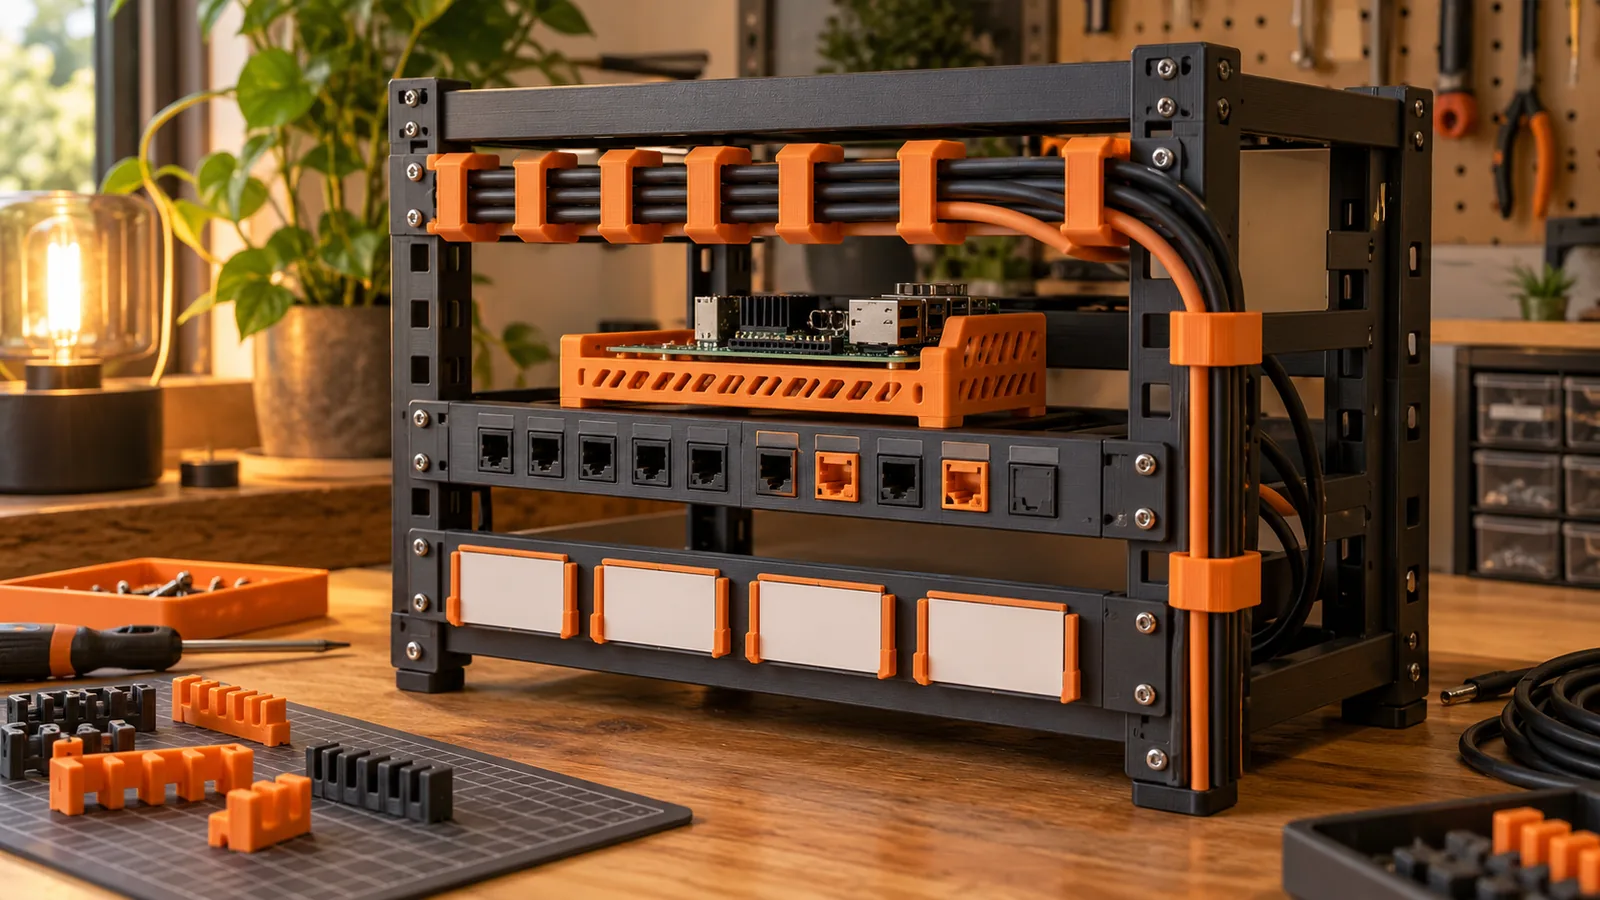
Print cable combs, label holders, vented Pi mounts and custom panel inserts. Use PETG for most indoor functional parts, add heat-set inserts for repeated assembly, and put heavy NAS or UPS gear on metal shelves.
- Default materialPETG
- Print the fitMounts + organizers
- Buy the structureMetal shelves
Your rack has a gap exactly the wrong size, the Pi is balancing on a box, and the cable bundle has developed its own personality. Those are excellent jobs for a printer. Start with the little parts that make the rest of your gear easier to use.
Research guide: material and hardware details come from the makers, checked October 28, 2026.
Print the fit; buy the structure. Cable combs, label holders, vented Pi mounts and custom panel inserts are useful first projects. Give a heavy NAS or UPS a metal shelf. The 3D printing hub covers the printer side; this guide is about putting your next spool to work.
Moving from PETG to ASA or ABS? Plan the enclosure, ventilation and power setup before starting the next rack part.
What is worth printing?
| Job | Print this | Buy this instead |
|---|---|---|
| Tidy a cable bundle | A comb with slots that match your cables; clip-in label holders | The cables and connectors |
| Fill a rack gap | A blanking panel or vented insert | A metal frame and the rack’s mounting hardware |
| Add network ports | A panel that holds your chosen keystone jacks | The actual jacks, couplers and patch leads |
| Mount a Raspberry Pi | A vented cradle, rack faceplate or case around the exact board and cooler | The cooler, spacers and fasteners |
| Support a small accessory | A short tray designed for that device and mounting arrangement | A metal shelf for heavy or valuable equipment |
| Organize drives | A model-specific caddy or an offline-drive storage tray | A load-bearing drive cage or electrical backplane |
The sweet spot is customization: the odd hole spacing, the cable exit on the wrong side, the label you want to swap without adhesive. If a standard metal shelf already does the job, let it.
The buy list: a spool, reusable threads and measuring tools
For receiving-hole dimensions, insert-tip fit and the finishing workflow, use our 3D printing toolkit guide.
Choose the items your model actually uses. You can start with filament and calipers; inserts earn their place when a lid or bracket will come apart repeatedly.
We earn a commission if you buy through our links — it doesn’t change our picks. How we make money → As an Amazon Associate I earn from qualifying purchases.
- Filament: Polymaker PETG, black, 1 kg. A sensible default for indoor mounts and organizers. The maker describes this PETG for brackets, mounts and fixtures.
- Heat-set inserts: ruthex GE-KASTEN-001 assortment. Put a reusable metal thread in a printed boss. This box contains M2, M3, M4 and M5, not M2.5.
- Insert tool: ruthex LOE-SET-012 tip set. Includes an M3 tip and a 900M/T18 adapter for a compatible soldering iron; the iron is separate. The maker’s adapter specification matters as much as the tip size.
- Project screws: Fgruh metric pan-head screw assortment. A source of M3 and M2.5 machine screws and nuts for models designed around those sizes. Match the head style and screw length to the model’s parts list.
- Board spacers: Geekworm M2.5 hardware kit. The maker lists 5 mm screws, nuts and several spacer lengths. Useful when your mount calls for a board raised above its base.
- Rack frame: DeskPi RackMate T1. Buy the frame, then personalize its 10-inch accessory space. Our small rack and shelf guide explains the depth and shelf choices.
- Calipers: iGAGING OriginCal 100-700-06. Measure the thing you own before adjusting the model. The maker’s model table identifies this 6-inch caliper.
Pick the filament for the job
Match a mount, clip or panel to the spool with our PLA vs PETG vs ASA vs TPU guide, including maker heat data for the exact picks.
PETG suits most indoor rack accessories. Prusa describes it as tough, with good layer adhesion and useful temperature resistance for mechanical parts and holders. That combination suits a cable guide or a Pi cradle better than choosing filament purely for its colour. Its flexibility also matters: a long, thin shelf can still bend. Prusa’s PETG guide explains the material’s strengths and printing behaviour.
| Material | Good homelab jobs | What changes your choice |
|---|---|---|
| PLA | Label holders, decorative blanks, cool desk organizers and fit prototypes | Low heat resistance; keep it away from hot exhaust and sustained loads |
| PETG | Cable guides, vented board mounts, panel inserts and functional brackets | Allow for flex; use a supported design rather than a long cantilever |
| ASA | A part exposed to sunlight or a warmer environment | Requires the right printer conditions and ventilation |
| ABS | Heat-tolerant functional parts where the model specifies ABS | Warping and fumes make enclosure and ventilation planning important |
Those are job choices, not universal temperature or weight ratings. Prusa’s PLA, ASA and ABS guides explain the differences. For ASA or ABS, use an enclosure and appropriate ventilation rather than moving the printer onto the desk beside you.
Dry the spool according to its maker’s instructions before chasing stringing through endless slicer changes. Our filament drying and storage guide separates drying a wet spool from keeping a dry one ready.
Make a 10-inch rack feel custom
Blanking panels are a friendly first project: simple geometry, easy measurements and an obvious payoff. Add a removable label tab or cable opening where it helps. Preserve the equipment’s real intake and exhaust paths; covering an empty opening is a layout choice, not an automatic cooling upgrade.
Keystone patch panels are another good fit. Print the holder around the exact jack’s clip and body, leaving room for cables behind it. Buy the electrical components. The printed part supplies the shape; the keystone supplies the connection.
Shelves need more thought. A short tray for a light accessory is a different job from suspending a multi-drive NAS between two plastic ears. Heavy gear goes on metal shelves, with the shelf’s load and depth matched to the rack. The RackMate documentation shows its matching shelf and panel family; use those dimensions as a starting reference, not a claim that every “10-inch” model fits.
Measure the mounting-hole spacing, usable width and depth, then include the plugged-in cables. A tray that fits the bare box but crushes its power lead needs another revision.
Give your Pi 5 air, not just a parking space
A useful Pi mount holds the board securely while leaving its ports, storage and cooling accessible. Choose a Pi 5-specific model that names the Active Cooler and any HAT or NVMe board you plan to use. “Raspberry Pi case” is a broad search, not a parts list.
The official Active Cooler brief shows a heatsink and temperature-controlled blower attached with spring-loaded pins. Leave space around the blower intake and exhaust, route the fan lead without pinching it, and keep access to the USB-C power connector. A vent in the wrong place is just decoration.
Use the Pi 5 mechanical drawing for the board layout, then measure your assembled cooler and storage stack. Print a corner or mounting-hole sample before committing to the whole case. Our Pi 5 kit and parts guide covers the board, power and cooling choices.
Cable combs, label holders and drive caddies
Cable combs should organize cables without squeezing them. Match slot size to the actual jacket, leave a comfortable bend into each connector, and make the comb removable so a cable swap stays easy. A clip-in design beats threading every lead through a closed hole after the rack is wired.
Label holders are ideal for PLA in a cool spot. Make the insert replaceable and leave enough space to read it after the cables are connected. You get the satisfying part of labeling without committing adhesive to every surface.
Drive caddies need exact dimensions, screw positions and airflow openings. Print a model-specific holder for a small drive or a tray for disconnected backup disks; retain the original metal support for a heavy drive array. For a live hot-swap setup, use a proper cage and backplane rather than trying to print its electrical interface.
Strength starts with walls and orientation
Before increasing infill, inspect the outside of the part. Prusa’s slicer guidance puts perimeters at the centre of strength. Follow the designer’s wall count, and pay attention to the plastic around mounting holes and insert bosses.
Orientation matters too. FFF prints have directional strength: a bracket loaded along its printed strands behaves differently from one pulled apart between layers. Use the designer’s intended orientation; when designing your own, avoid a load that peels a thin tab away at a layer boundary. Prusa’s modeling guide covers orientation and iterative fit.
Heat-set inserts make repeated assembly nicer. Use the exact ruthex insert geometry when sizing the receiving hole and surrounding boss. M3 describes the screw thread, not a 3 mm hole for the insert. Seat it square with the matching heated tip, let the plastic cool, then fit the screw. Stop the screw before it bottoms out or reaches the board.
Find a model, then make it yours
Browse Printables, MakerWorld and Thingiverse. Useful searches include “10 inch rack blank,” “Pi 5 Active Cooler rack mount,” “parametric cable comb” and “keystone panel.” Search with your device or rack model as well.
Read the designer’s material, orientation and hardware notes. Open the license on each model for attribution, remix and commercial-use terms; Printables’ terms explicitly leave the license choice to the uploader. Download from the creator’s page, keep the license and parts list with the file, and link people back there instead of rehosting it.
Your first-project checklist is short:
- Measure the rack, board or cable bundle, including plugs and clearance.
- Choose a model with the right hardware and cooling arrangement.
- Use its material, orientation and perimeter recommendations.
- Print a small fit sample; adjust before the full part.
- Install inserts and hardware, then fit the part with power disconnected.
- Reconnect, inspect airflow and cable access, and keep the file version that fits.
Want the printer dashboard on your own network? Follow our Bambu LAN-only, Klipper and OctoPrint guide. Start with one cable comb or Pi cradle. Solve a small annoyance, then print the next useful thing.
Building a radio too? Print a Meshtastic pocket case or internal solar-node mount around the exact board, battery and antenna exit.
Sources & methodology
Where these facts come from.
- Prusa: PETG for functional parts · checked October 28, 2026
- Prusa: PLA applications and limitations · checked October 28, 2026
- Prusa: ASA heat, UV and printing conditions · checked October 28, 2026
- Prusa: ABS printing conditions · checked October 28, 2026
- PrusaSlicer: perimeters and strength · checked October 28, 2026
- Prusa: orientation and fit iterations · checked October 28, 2026
- ruthex: insert assortment and geometry · checked October 28, 2026
- ruthex: LOE-SET-012 tips and adapter · checked October 28, 2026
- DeskPi: RackMate T1 and matching accessories · checked October 28, 2026
- Polymaker: PETG functional applications · checked October 28, 2026
- iGAGING: OriginCal model table · checked October 28, 2026
- Printables: model licensing terms · checked October 28, 2026
- Raspberry Pi: Active Cooler product brief · checked October 28, 2026
- Raspberry Pi: Pi 5 mechanical drawing · checked October 28, 2026
- Geekworm: M2.5 hardware contents · checked October 28, 2026
Source dates are listed above.
As an Amazon Associate I earn from qualifying purchases.
Parts from this article
The gear, on Amazon
The models recommended above, with the specifications that matter for your choice.
Functional parts spool
Polymaker PETG, black 1 kg
Move to PETG when your project calls for tougher functional parts.
Reusable screw threads
ruthex GE-KASTEN-001 threaded insert assortment
Add metal threads to a printed lid or bracket that you will open again.
Install the inserts
ruthex LOE-SET-012 insert tip set
Use the matching tip to seat your inserts straight with a compatible iron.
M3 project fasteners
Fgruh metric pan-head screw assortment
Keep machine screws and nuts ready for printed parts designed around metric hardware.
Board mounting hardware
Geekworm M2.5 spacer, screw and nut kit
Build a raised board mount with M2.5 fasteners and spacers from the model’s parts list.
Best 10-inch mini rack
GeeekPi DeskPi RackMate T1 (DP-0022), Black
Choose this shallow mini rack for compact boxes and matching 10-inch accessories.
Measure the fit
iGAGING OriginCal 100-700-06 caliper
Measure holes, brackets and the part you are replacing before opening your CAD sketch.
Prepared by Racks & Watts.